Building A Python Docker Image using Private PyPI Repository

Building A Python Docker Image using Private PyPI Repository

One of the greatest advantages of our Orquestra Platform is that it’s hardware agnostic. That means users can run their machine learning and other application workflows on both classical and quantum hardware using cloud computing resources. This abstraction is great for running experiments, benchmarking different hardware backends, and ultimately choosing the best hardware configuration for your given use case — with the flexibility to swap in more powerful hardware down the line.
To build this abstraction into the platform, we’re using the Ray framework on Kubernetes. A Ray cluster consists of multiple nodes where each node corresponds to a Kubernetes pod. To use our proprietary Python code on Ray nodes, we needed to build a custom Docker image that contain Python modules which are stored in our private PyPI repository. In this post, I will describe how we implemented this Docker image and avoided possible security issues along the way.
To build the Docker image and install the Python dependencies, I have first tried to use basic authentication in the index URL passed to pip as follows:
RUN pip install --index-url https://username:password@nexus.example.io orquestra-runtime
This works. And since this Dockerfile is stored in a private version control repository, you might think that’s OK. However, it’s not a good idea to have the credentials in clear text. Anyone who has access to your version control repository can have access to your PyPI repository in case of a security breach in your version control system.
A common technique we use when we don’t want to provide sensitive information directly is obtaining it from an environment variable and injecting it from a secure source such as Vault. I couldn’t do it in this case because pip doesn’t let you pass credentials in environment variables. You can only use basic authentication or a .netrc file.
.netrc file needs to be stored in your user’s home directory and contain the credentials for the server you’re using.
1 machine nexus.example.io

2 login emre-aydin

3 password qwerty
In order for the Docker build process to use .netrc, we need to make it available to the pip process that installs the dependency. For that, we have to COPY the file into the container before executing pip. To make sure that the user code which will work on this Docker container doesn’t have access to the credentials, we delete .netrc afterwards.
FROM python:3.9

COPY .netrc .

RUN pip install --index-url https://nexus.example.io orquestra-runtime && rm /root/.netrc
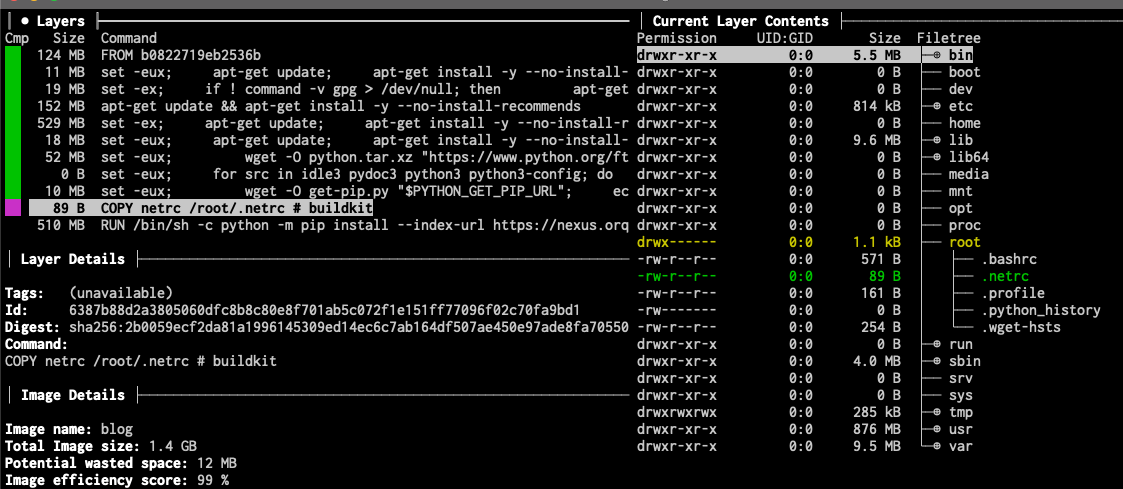
Knowing how Docker container images are file layers stored on top of each other, I wondered whether the file was still readable somehow. To see the layers of the image, I have used the dive tool. In the following screenshot, you can see how the .netrc file that we intended to keep as a secret is stored in one of the layers in the image.

If someone acquires access to the Docker agent that runs on our clusters or grasp the Docker image in another way, they will have access to the credentials for our Nexus repository as well.
Docker BuildKit has a neat feature called secret mounts to solve this problem. It’s a way to mount local files secretly during the build process. This way, the secret information that we store in the .netrc file doesn’t end up stored in the final image or any of its layers.
1 FROM python:3.9

2 RUN --mount=type=secret,id=netrc,uid=1000 \

3   cp /run/secrets/netrc /root/.netrc \

4 && pip install --index-url https://nexus.example.io orquestra-runtime netrc above is injected to the GitHub Actions workflow by GitHub using the repository secrets which means it comes from a secure source and not accessible in plain text by anyone.
1 - name: Build and push

2   uses: docker/build-push-action@v3

3   with:

4   context: .

5   push: true

6   secrets: |

7     "netrc=${{ secrets.NET_RC }}"

8   tags: nexus.example.io/ray

9
It might be tempting and easy to pass secret information in your build process but it might have unforeseen security implications. In this post, we have seen such an example and found a solution to it by improving it incrementally.


